Alimentor User Guide

Learn how to use Alimentor – the essential child custody calendar and journal app for co‑parents.

Welcome!

Thank you for choosing Alimentor. This guide is designed to provide you with answers to the most commonly asked questions and offer tips on how to make the most out of Alimentor.

We are here to support you every step of the way. If you have any questions or need assistance with the app, please don’t hesitate to reach out. Your feedback is invaluable to us, and we rely on your input to continuously improve your experience.

You can contact us at: feedback@alimentor.org.

This guide is here to help you, but we’re always just an email away if you need more personalized support. I wish you a smooth and successful journey with Alimentor.

Warm regards,

Tomasz Domański
Founder of Alimentor

  Quick Start Tips

For a comprehensive guide on setting up and organizing your data in Alimentor, please read: Getting Started with Alimentor ▶

If you’re looking for a quick introduction, here are some essential tips that highlight the key features of Alimentor compared to a classic calendar or journaling app:

  • Alimentor allows you to create four types of records: parenting time, calls, expenses, and memos, keeping all relevant information in one place.
  • Each parenting time record can capture both the planned time (custody schedule) and the actual time spent with the child.
  • To add a new record, tap the button or select any day on the calendar.
  •  iPhone  Be mindful of the event type and person selectors above the calendar; they determine which events and for whom are displayed and created in the calendar.
  • Track visitation time for only one parent to minimize data entry. The report can automatically allocate unassigned time to the other caregiver, saving you time and effort.
  • Use the Canceled status to log no-shows, withheld visitations, or missed payments.
  • Optionally, use the Disagreement indicator to highlight conflicting events on the report.
  • Customize your reports by using the Setup button in the Report View. For everyday use, generating reports for shorter periods, such as monthly or every four weeks, is recommended.
  • You can easily share your data with others via iCloud Sync or export your records to external calendars using CalSync, ensuring everyone stays informed.

  Recommended Articles

  Entering Historical Data

If you've tracked parenting time before using Alimentor, you can add historical records to create complete and accurate reports. Consider how far back you want to go, as entering detailed history can be time-consuming.

To import an event from an external calendar:
  1. Open the event stored in your device’s calendar by selecting it in the Alimentor calendar. (Ensure Alimentor has access to your device’s calendar).
  2. Select Import as Parenting Time to add it to your records.

Learn More ▶

To recreate history using recurring events:
  1. Set up recurring events starting in the past.
  2. Use the calendar or the Planned View to update the status of each event to Actual or Canceled, adjusting dates as needed.

  Event Statuses

Status Description View
Planned Use this status for events that are scheduled to occur in the future. Planned
Actual This status is for events that have already taken place. Diary
Canceled Use this status to log events that were part of your custody agreement but did not occur for various reasons, such as withheld visitations, no-shows and missed payments. Diary

  Calendars

Bar Colors

Calendar bars can display colors assigned to either caregivers or beneficiaries.

Calendar View:
  •  iPhone  The calendar displays colors assigned to children/beneficiaries when viewing data for a caregiver. Similarly, when viewing data for a child, the color shown in the calendar is taken from the caregiver’s profile.
  •  Mac   iPad  Use the Bar Colors setting located in Filters to adjust your preferences.

Report Calendar:
  • To change the colors used in the report calendar, modify the Breakdown by setting.

Bar Heights

When multiple events occur on the same day, the calendar automatically shortens the height of the event bars to display them all. This can make the labels smaller and harder to read.

Improving Readability:
  • Adjust the calendar filters to reduce the number of events displayed.
  • Consider reducing the number of separate entries for the same time frame, for exmaple, by logging multiple purchases in a single expense record.
  •  Mac  Zoom in using a trackpad or Magic Mouse.

Autofill

The report calendar can be configured to automatically assign unallocated time to a selected caregiver, allowing you to generate calendars for both parents while tracking time for only one. It applies only to the Custody Calendar section of the report. The main application calendar does not use Autofill.

To set up Autofill:
  1. Open the Report View and click the Setup button in the upper left corner.
  2. Scroll down to the Calendar section.
  3. Choose the default caregiver in the Autofill setting.
  4. Ensure this caregiver is included in the report’s scope.

  Custody Schedules

If you have recently separated from your spouse, consider reading the article on planning your time with kids ▶

To include an event in your custody schedule, set its Scheduled attribute. This attribute is automatically applied to planned, canceled and recurring events.

For nonrecurring events:
  • Clear the Scheduled attribute when logging unplanned parenting time.
  • Set the Scheduled attribute for events that are part of your agreed schedule.
Scheduled Parenting Time

Regular Schedule

You can create recurring events that repeat themselves:
  • weekly,
  • monthly,
  • yearly,
  • daily,
  • on selected weeks of the month*.

* For events that repeat on selected weeks of the month, you can set the first day of the week. The first week of the month is determined based on this setting.

You can create complex visitation schedules by using multiple recurring events.

2-2-5-5 Schedule Example:

In a 2-2-5-5 schedule, the child spends two nights with the first parent, followed by two nights with the other parent. Then, the child spends five nights with the first parent and subsequently five nights with the other parent.

Parent Duration
Parent A 2 nights
Parent B 2 nights
Parent A 5 nights
Parent B 5 nights

To model this schedule, create two events repeating bi-weekly for one parent:
  1. First event: 2 nights.
  2. Second event: 5 nights, starting after the 2 nights with the other parent.

2-2-3 Schedule Example:

In a 2-2-3 schedule, the child spends two nights with the first parent, followed by two nights with the other parent, and then three nights with the first parent. The pattern reverses the following week, ensuring both parents have equal time with the child, including alternating weekends.

Week Parent Duration
Week 1 Parent A 2 nights
Week 1 Parent B 2 nights
Week 1 Parent A 3 nights
Week 2 Parent B 2 nights
Week 2 Parent A 2 nights
Week 2 Parent B 3 nights

To model this schedule, create three events repeating bi-weekly for one parent. For example:
  1. First event: 2 nights, starting on Monday of Week 1.
  2. Second event: 3 nights, starting on Friday of Week 1.
  3. Third event: 2 nights, starting on Wednesday of Week 2.

If you have more than one child with the same regular custody schedule, you need to decide how to assign children to recurring events:
  • If actual parenting time often differs between children (e.g., an older child stays longer), it’s better to create separate recurring events for each child to easily track individual pick-up and drop-off times.
  • Otherwise, you can assign multiple children to the same recurring events that represent your custody schedule. In case of differences, duplicate the individual occurrence and use a separate copy for each child.

School Time

Most parents avoid excluding school hours from parenting time, as this complicates tracking and reporting. Overly detailed records can be harder for mediators or the court to review.

To achieve a more equitable distribution of parenting time, rather than assigning all school hours to one parent, consider splitting the time evenly. On days when one parent drops the children off at school and the other picks them up, you can set the start or end of parenting time to the middle of the school day.

Holidays

When planning holiday parenting schedules, consider the following approaches:
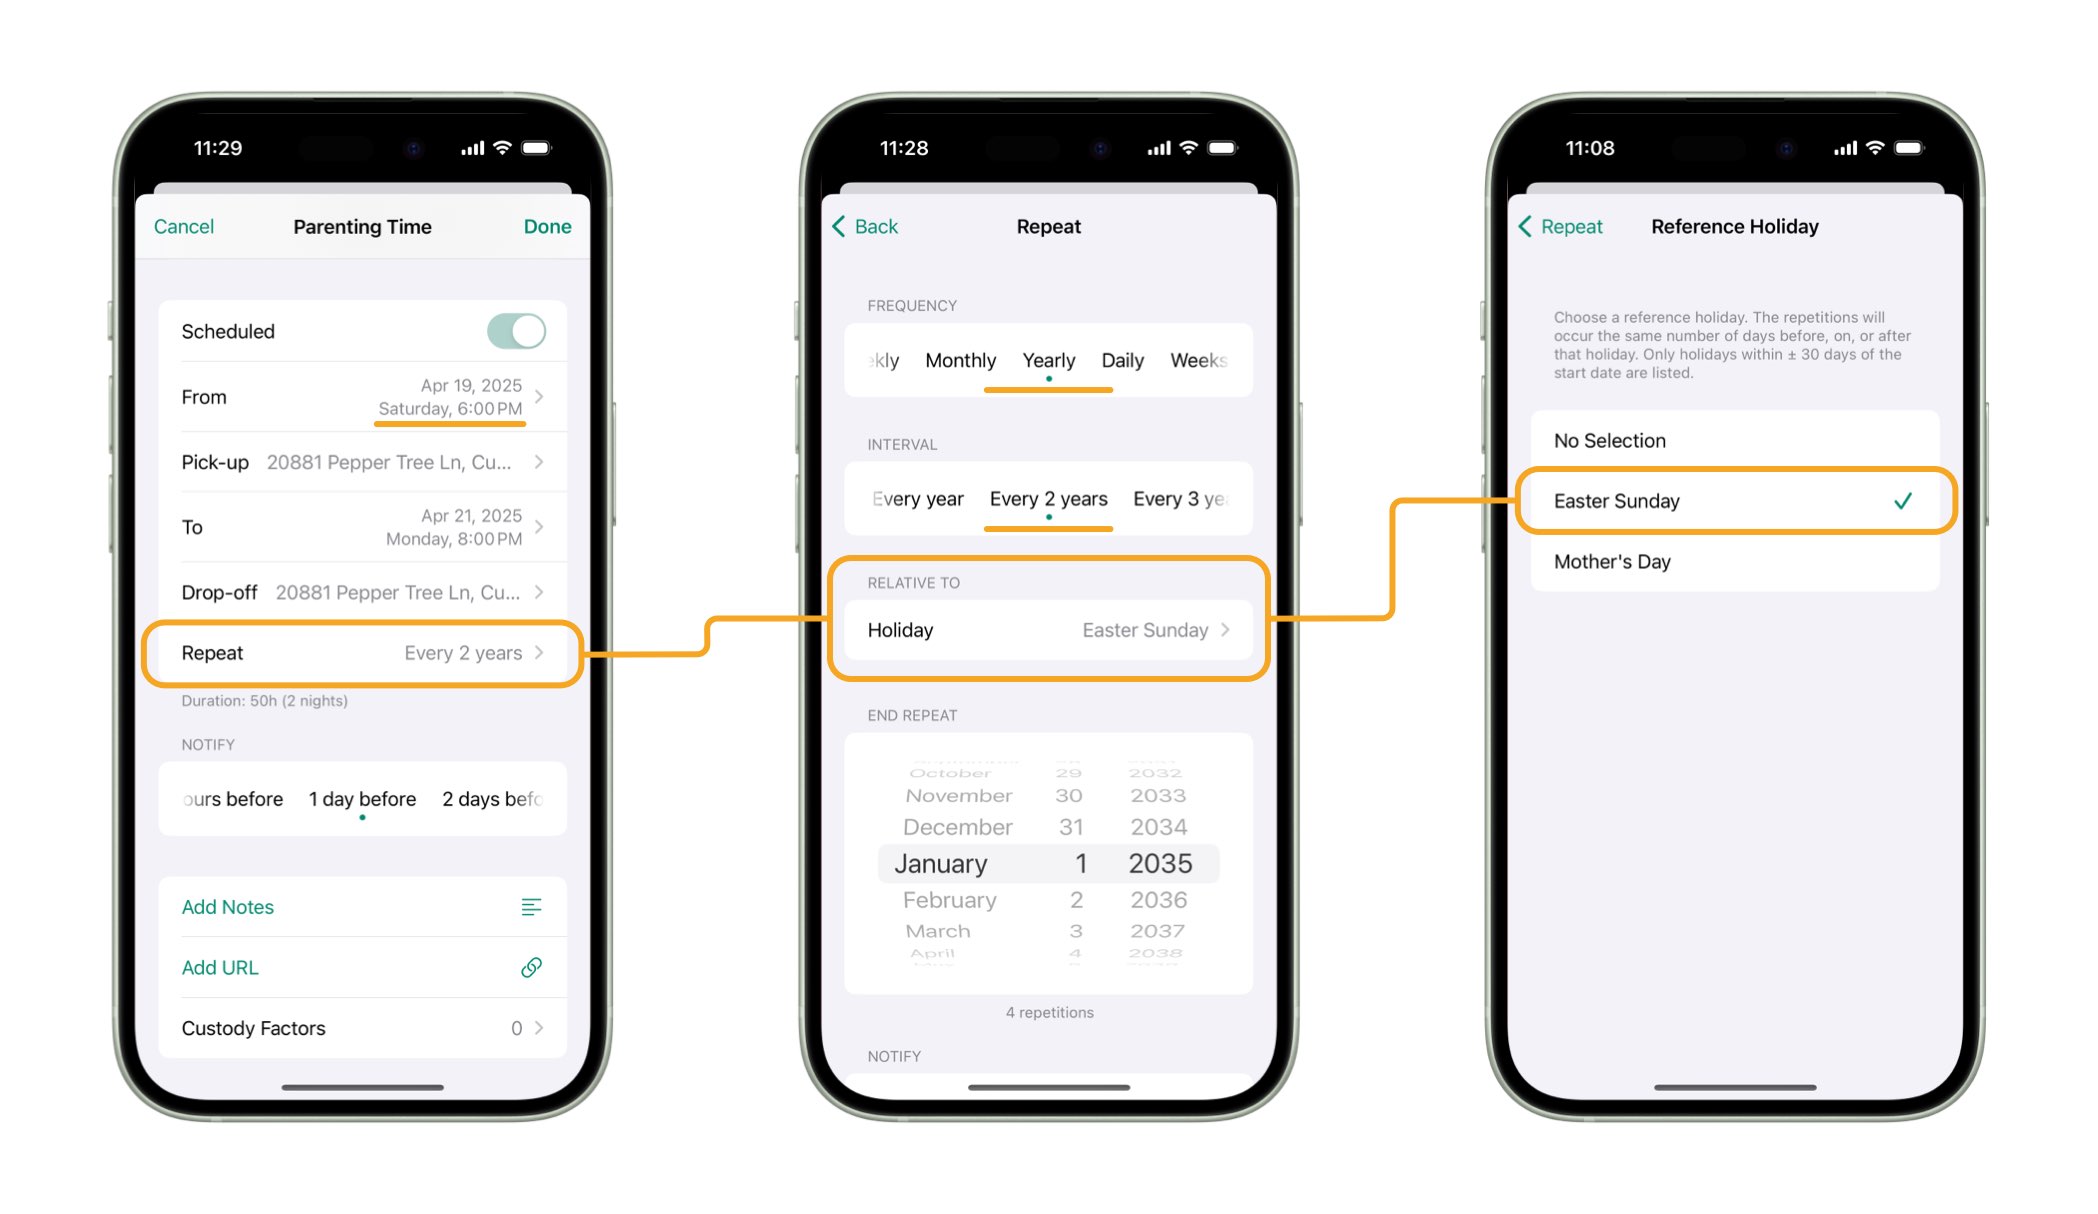
  • For holidays that occur on fixed dates, create recurring events that repeat every two years. Minor adjustments may be necessary for observed holidays.
  • For other holidays, create the required individual records for the next one or two years.

The following features help you easily input and manage holiday visitation schedules:
  • Parenting time records for both regular and holiday schedules can overlap, which reduces the need to modify your regular visitation schedule. The timeshare and totals calculation algorithm accurately accounts for these overlaps, ensuring that time is not double‑counted.
  • You can freely change the scheduled dates and times of individual occurrences of a recurring event and delete any unwanted occurrences. Adjusting a single occurrence does not affect the remaining occurrences.

Schedule Adjustments

To enter individual deviations from your basic schedule (e.g., school holidays or vacations), use the calendar or navigate to the Planned View to edit or delete selected entries.

Changing the scheduled dates for a single occurrence of a recurring event does not affect other occurrences. In addition to changing the planned dates, you can also edit the title and add notes or attachments, such as an email confirming the agreed schedule change.

To make permanent changes to the schedule, delimit outdated recurring events and create new ones. To delimit a recurring event, either edit the recurrence rule or open the first occurrence you want to remove, choose Delete, and select "Delete This and Future Events".

To quickly navigate to the initial instance of a recurring event to edit the repetition rule, such as changing the end date or deleting the rule altogether:

  •  iOS  Open any occurrence of the recurring event and tap the "i" button in the Repeat row. When prompted, choose Edit Recurring Event. Then tap the Repeat row to make the necessary changes.
  •  Mac  Open any occurrence of the recurring event, click the Tools toolbar button, and select Show Recurring Event.

Comparing Alternative Schedules

To test potential custody schedule adjustments, you can edit existing recurring events. When you change a recurrence rule, the changes apply to all occurrences that have not been manually edited.

If you want to compare two or more alternative schedules, you can define additional temporary caregivers (e.g., John V1, John V2) and create recurring events assigned to them. New events can be created from scratch or by duplicating existing events using the Duplicate tool available in the event editor. Once you’ve decided on the optimal schedule, remove unwanted recurring events and delete any unused caregivers.

  Actual Visitation Time vs. Schedule

Each parenting time record can store information about both the planned parenting time (custody schedule) and the actual time when your child was with you or another caregiver. This feature allows Alimentor to detect and report any deviations from your agreed schedule.

To store both time pairs (planned and actual), set the record status to Actual and ensure the Scheduled switch is turned on.
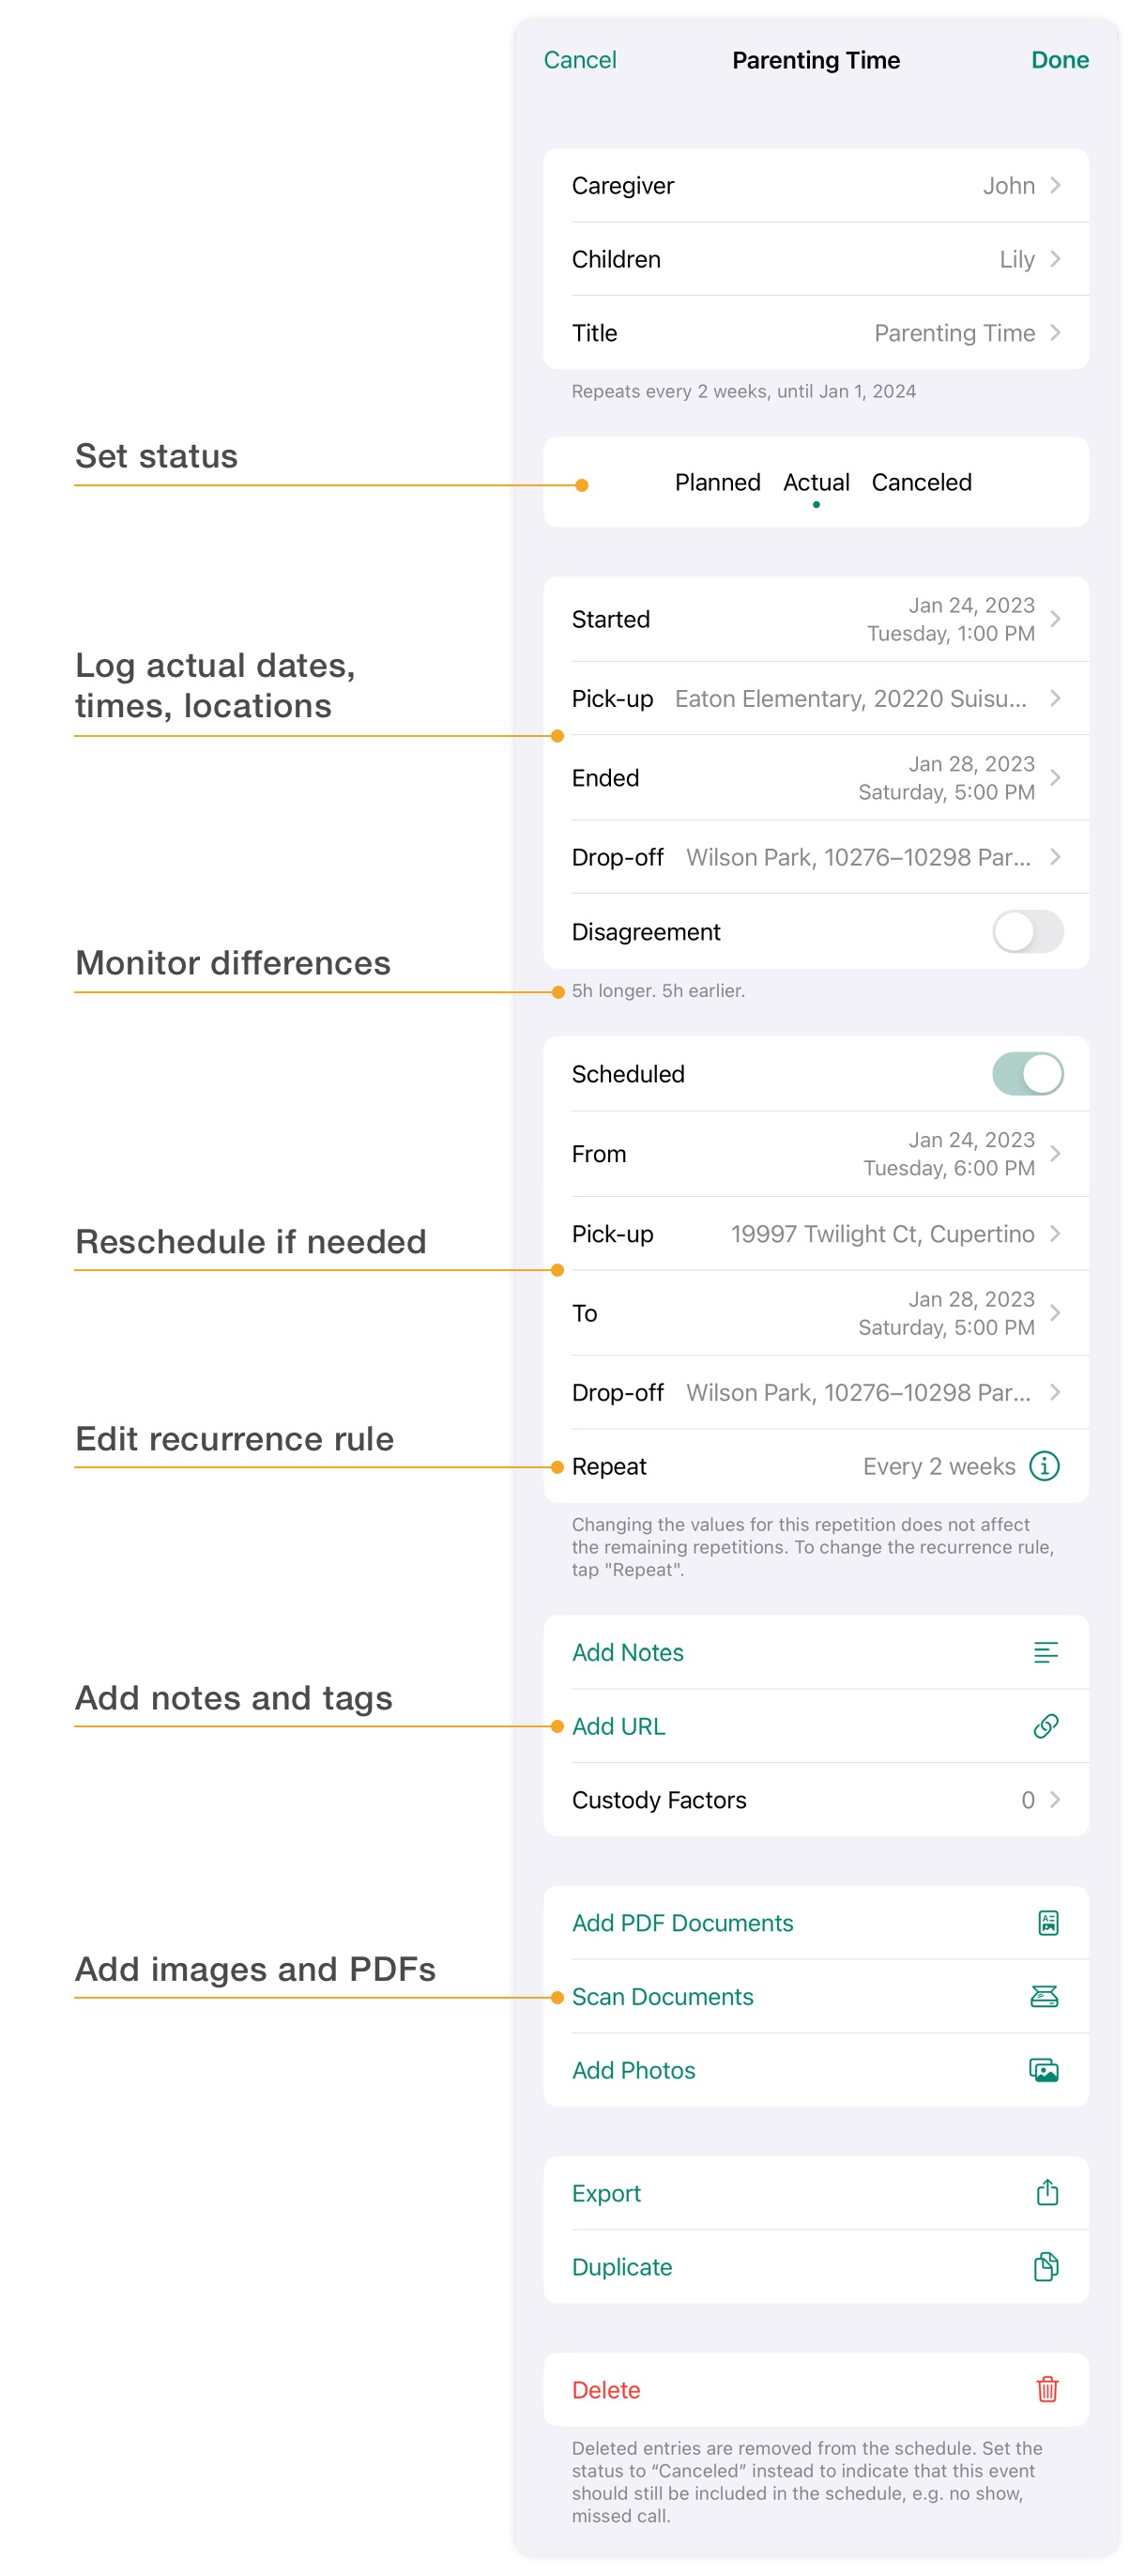
Editing Visitation Record

  Custodial Timeshare

The visitation timeshare, or the percentage of time each parent has the child, is calculated as: (Custody time duration / Reporting period duration) × 100%.

Alimentor calculates two different percentages:
  • Timeshare percentage (hr %) – based on hours
  • Nights percentage (n %) – based on nights

 iOS  The custodial timeshare displayed in the Home View below the calendar is based on hours and calculated for a monthly period.

You can customize your reporting settings to calculate parenting timeshare for a custom period. To set your reporting preferences, including a custom reporting period, use the Setup button located in the upper left corner of the Report View.

  Expenses

When tracking expenses, use the first field to indicate the payer and the second field (where you can select multiple persons) to enter beneficiaries (payees). If you are tracking your own expenses, enter your name in both fields.

To track reimbursements, enter one parent as the payer and the other as the payee.

To log unpaid, scheduled (agreed) expenses, use the status Canceled.

You can export all Alimentor records to a spreadsheet file for advanced calculations or to create charts. To generate a file in .xlsx format:

  •  iOS  Go to Settings and tap Export to Spreadsheet.
  •  Mac  Choose File > Export as Spreadsheet... from the menu bar.

Learn more about tracking expenses and reimbursements ▶

  Call History

Use the Call record type to log parent‑child call history, including the date, time, and duration of calls.

The title field can be used to specify the call type, such as FaceTime or phone call.

To indicate that an attempt to make a call was made, but there was no conversation with your children, set the actual call duration to zero.

 iOS  If you add contact details to your child’s profile, they will be displayed in the event editor for call records, allowing you to quickly initiate a call. When the call ends, the date and duration fields will be automatically updated.

  Documenting Conversations

You can document iMessage or SMS conversations in Alimentor by copying them as text, PDF, or images. Follow the steps below based on your device:

 Mac  On your Mac:
  • Copying as text:
    1. Open the Messages app and display the conversation you want to copy.
    2. Click and drag your mouse pointer to highlight the messages.
    3. Choose Edit > Copy (⌘+C) from the menu bar.
    4. Switch to Alimentor and paste the copied text into the record notes using Edit > Paste (⌘+V).
  • Copying as PDF:
    1. In the Messages app, select File > Print… (⌘+C) from the menu bar.
    2. Click the PDF button and select Save as PDF.
    3. Choose a file location and click Save.
    4. Switch to Alimentor, start editing th  selected event, and click the Add PDF Documents button to select the saved file.
  • Copying as image:
    1. Take a screenshot of the Messages app window using the Screenshot app (⇧+⌘+4).
    2. Add the screenshot to the selected Alimentor record as an image.

 iOS  On your iPhone or iPad:
  • Copying as image:
    1. Open the Messages app and scroll to the relevant part of the conversation.
    2. To take a screenshot, press the side button and the volume up button simultaneously, then quickly release both buttons.
    3. Tap the thumbnail that appears in the lower-left corner of your screen to open it.
    4. Tap the Share button in the upper right corner, then select Copy.
    5. Switch to Alimentor, start editing the selected event, tap Add Photos, and select Paste from Clipboard.
  • Copying as text:
    1. Tap and hold the message you want to copy, then tap Copy.
    2. Switch to Alimentor, start editing the selected event, tap Add Notes, and paste the copied message.

  Documenting E‑Mail Correspondence

E‑mail correspondence can be stored in Alimentor as PDF documents.

 Mac  On your Mac:
  1. Open Mail and select the message(s) you want to export.
  2. Choose File > Export as PDF... from the menu bar.
  3. Select a file location and click Save.
  4. Switch to Alimentor and start editing the selected event.
  5. Click the Add PDF Documents button and select the saved file.

 iOS  On your iPhone or iPad:
  1. Open Mail and tap the message you want to export.
  2. Tap the action button (it looks like a reply arrow).
  3. Tap Print to open the printer options.
  4. Tap the Share button in the upper right corner of the screen.
  5. Tap Copy.
  6. Switch to Alimentor and start editing the selected event.
  7. Tap Add PDF Documents and select Paste from Clipboard.

  Locations

Alimentor records can store information about both scheduled and actual event locations. In the case of parenting time records, these locations represent pick‑up and drop‑off points.

Actual locations can be provided in two ways:
  • Automatically obtained from your device's location.
  • Manually selected on a map.

Locations obtained from your device are marked with specific icons:
  • Location Icon - Matching timestamp (GPS timestamp matches event date and time).
  • Location Icon - Non-matching timestamp (difference greater than 5 minutes).

You can manually adjust a location obtained from your device by selecting the desired point on the map within 150 feet of your current location.

  Reporting

Alimentor allows you to generate reports consisting of the following sections:
  • Custody Calendar: Includes the calendar, plus totals (timeshare, hours and nights of care, calls). The "Actual vs. Planned" layout visualizes differences between scheduled and actual parenting time.
  • Custody Summary: Provides summary tables and concise lists of records grouped by type, including parenting time, call history, expenses, and memos.
  • Summary of Expenses: Details total expenses by title and payer.
  • Custody Log: A chronological, detailed custody journal with attachments. The "Best Interests of the Child" layout organizes events by custody factors.

To change your reporting settings, tap the Setup button located in the Report View.
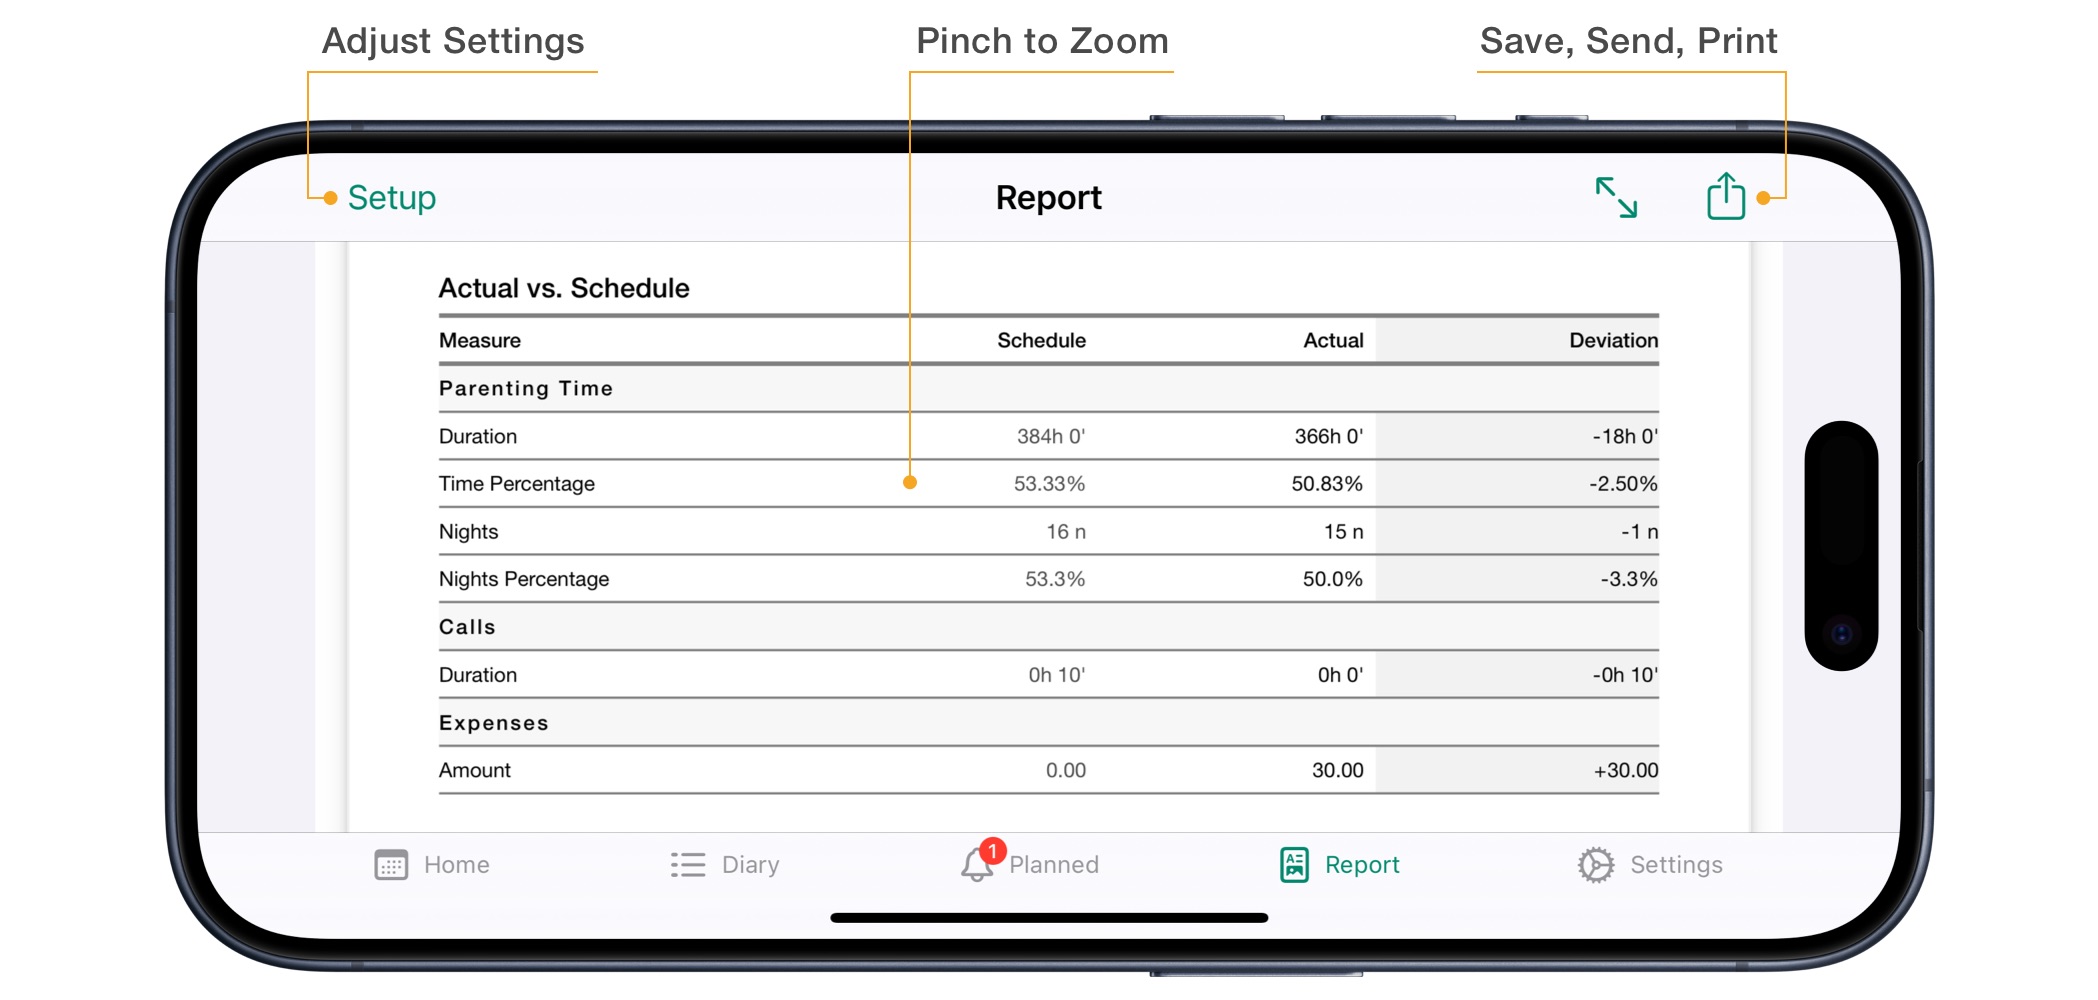
Co-parenting report on iPhone

Color Legend and Formatting

  • Black: Actual values.
  • Gray: Scheduled values.
  • Scheduled and actual records are presented in separate tables.
  • Available layouts: Actual vs. Schedule, Actual, Schedule.

Text Filters and Hashtags

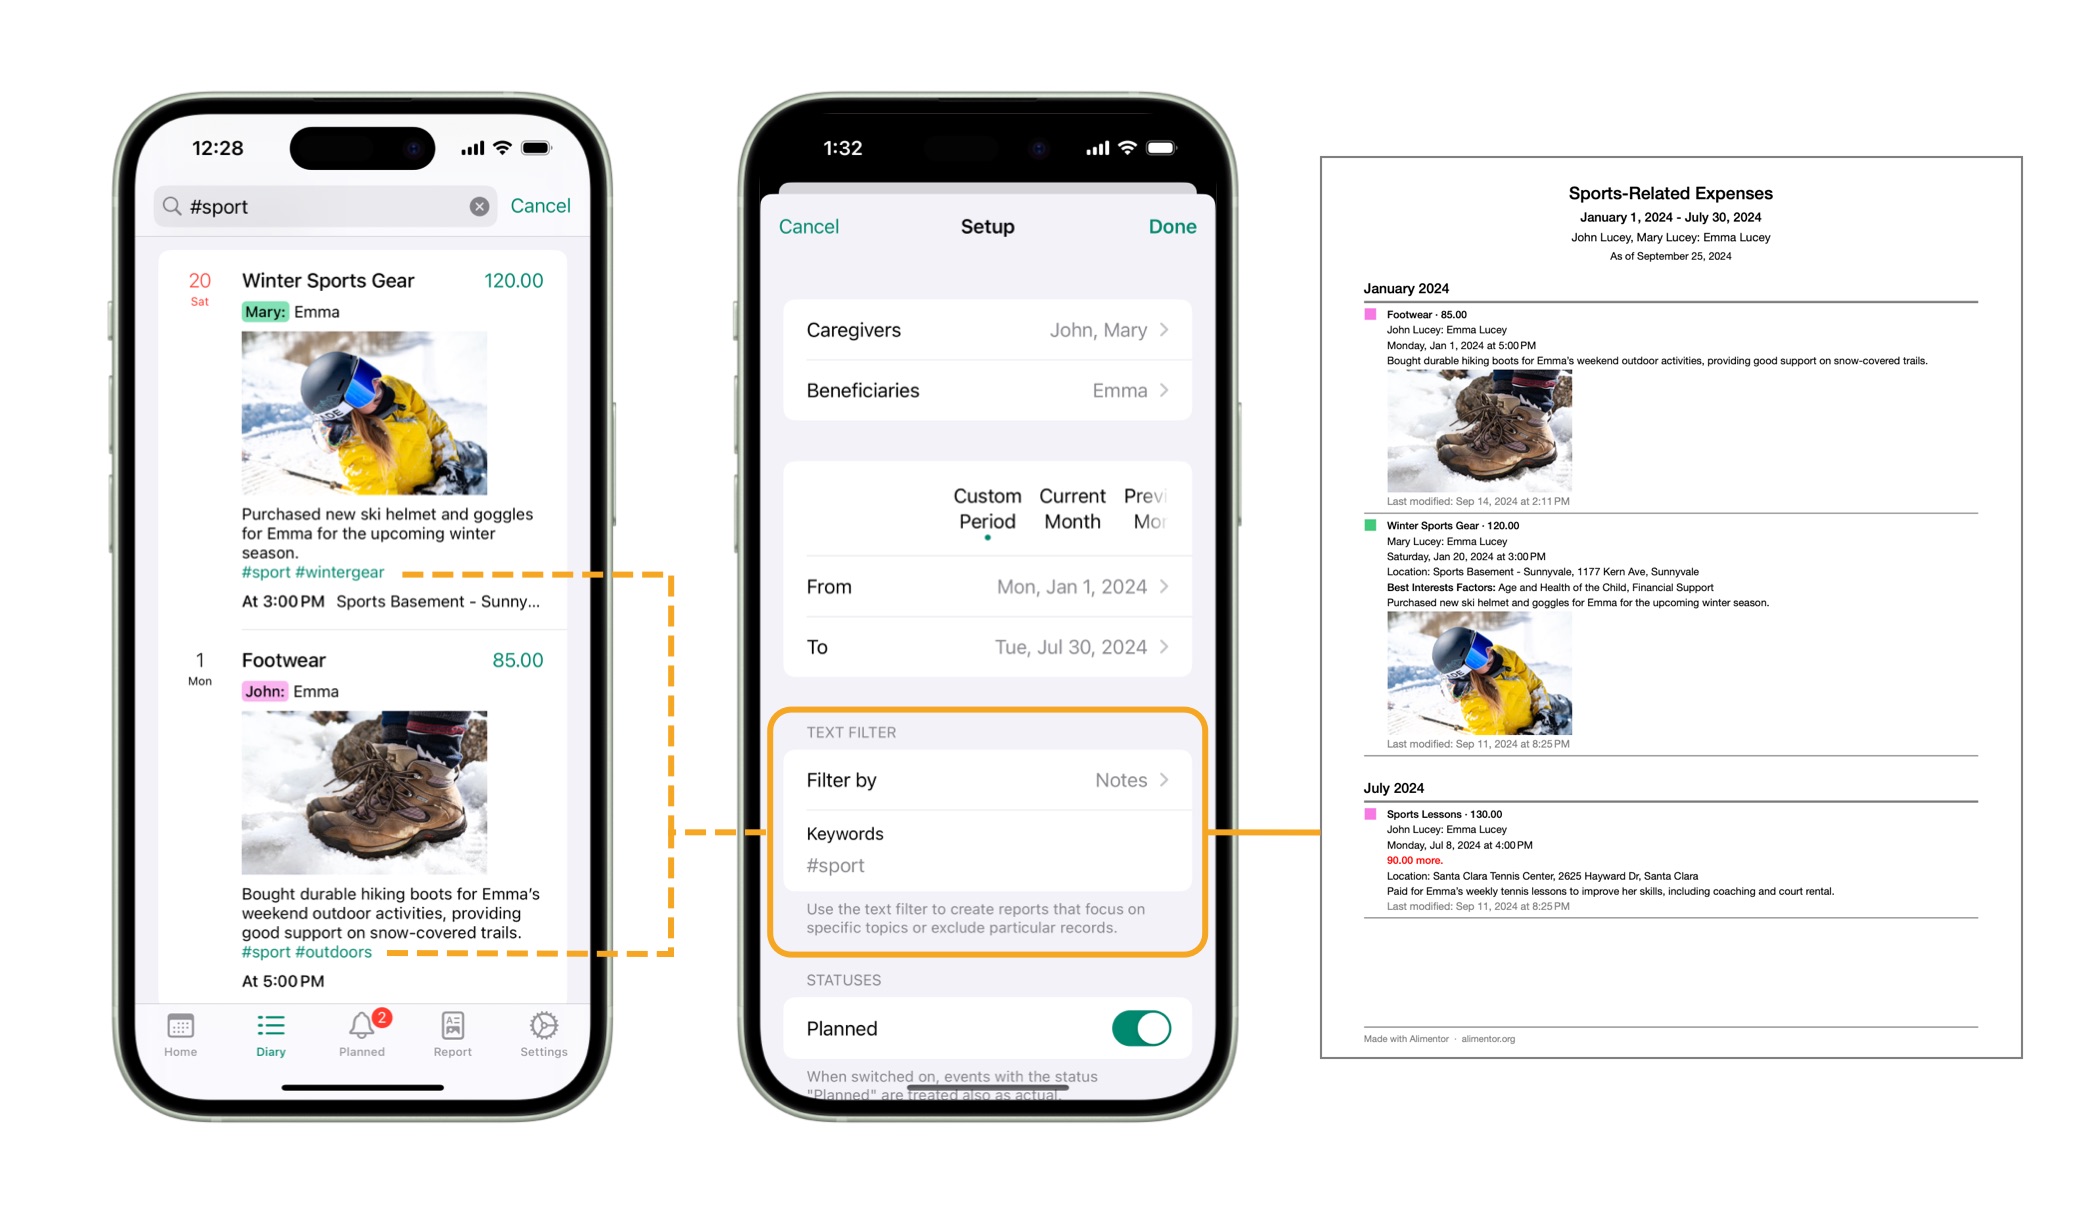
You can use text filters to create reports that include only specific records or exclude those that aren’t relevant. By combining the use of hashtags in your record notes with text filters, you can create your own system to organize and find your records.

Need Filter Example
Alternatives List options separated by commas School, Sport
Exclusion Prefix terms with a minus sign -#Private
Phrases Enclose phrases in quotation marks "School Trip"
Tips to remember:
  • You can filter records by titles or notes (including hashtags).
  • Text filters apply to all sections of the report.
  • Hashtags can be hidden in the report while still being used for filtering.
  • Place hashtags on a separate line within the notes to be able to hide them.
  • Use custom section titles to make your reports more compelling.

Creating Custom Court-Ready Custody Report

Report Generation

A single report is limited to 200 pages.

To reduce report size and speed up generation, consider the following options:
  • Set a shorter reporting period.
  • Select fewer caregivers or children.
  • Turn off portrait photos in headings.

Sample Report

  Export to Spreadsheet

You can export all Alimentor data records to a spreadsheet file for advanced calculations or to create charts.

To generate a file in .xlsx format:
  •  iOS  Go to Settings and tap Export to Spreadsheet.
  •  Mac  Choose File > Export as Spreadsheet... from the Alimentor menu bar.

  iCloud Sync

Alimentor uses Apple's iCloud service to sync and back up your data, eliminating the need for a separate account or login process. Your records are securely stored within your private iCloud container, hosted by Apple, alongside your contacts, photos, and other personal data.

With iCloud Sync, your data is seamlessly pushed across all your devices that use the same Apple Account. iCloud service runs in the background on your device, and updates may take a few seconds to several minutes to appear on other devices.

To view or change iCloud Sync settings in Alimentor:
  •  iOS  Go to Settings and tap iCloud Sync.
  •  Mac  From the Alimentor menu bar, choose Settings... and then select the iCloud Sync tab.
Troubleshooting:
  • Check if you have enough storage space available in iCloud.
  • Ensure that you are logged in with the same Apple Account on all your devices.
  • To verify that Alimentor identifies you as the same user on different devices, compare the value of the User ID field in the iCloud Sync settings dialog.
To view or change your Apple Account and iCloud storage settings on your device:
  •  iOS  Open the Settings app, tap [your name], then tap iCloud. Scroll down and find "Alimentor 2".
  •  Mac  Go to System Settings > Apple Account > iCloud. In the "Apps Using iCloud" section, click Show More Apps... and find "Alimentor 2".
Important Considerations:
  • If you have used iCloud Sync before and are turning it back on, be aware that Alimentor data records stored on your device will be merged with the records stored in iCloud.

  Sharing Data With Other Alimentor Users

How it works:
  • You can invite one or more users to access your data.
  • Data is always shared in read-only mode, others can't alter or delete it.
  • iCloud Sync operates unidirectionally by default, meaning sharing is not automatically reciprocated. For mutual sharing, both parties need to send and accept invitation links.
  • If someone shares data with you for a person who has the same nickname as one you’ve already used, Alimentor will link both profiles and display the combined data.
  • You can revoke access rights at any time, which will remove the shared data from the other user’s device(s).
  • While Alimentor allows you to view your device calendar, events stored in external calendars (Gmail, Outlook, etc.) are not included in iCloud Sync sharing.
To share your data with another Alimentor user:
  •  iOS  Open Alimentor, go to Settings > iCloud Sync, and tap Manage Access. Choose share options and send invitation(s).
  •  Mac  Click the Sharing button in the toolbar above the calendar. Choose share options and send invitation(s).
To accept an invitation from another user:
  1. Tap the authentication link you received to open it in Alimentor.
  2. Confirm that you want to open the "Alimentor 2 Database" shared by the other user.
  3. Wait for the shared data to download completely.

  Integration With External Calendars

Viewing Events

Alimentor calendar can display up-to-date events from your device’s calendar, showing daily events, holidays, and visitations together in one place.

To enable access to system calendars in Alimentor:
  •  iOS  Turn on the Device Calendar switch located below the calendar.
  •  Mac  Click the System Calendars... button on the left side of the main window.

Enabling access to system calendars does not affect the data stored in Alimentor.

Importing Events

Events from your device’s calendar can be manually imported into Alimentor as parenting time records. If you previously tracked visitations using your iPhone, iPad, or Mac calendar, you can use this feature to create historical records in Alimentor.

To import a visitation from your system calendar:
  • Open the event in Alimentor’s calendar view.
  • Select Import as Parenting Time.

Imported records are not affected by any later changes made to the original events, and disabling access to system calendars will not impact these records.
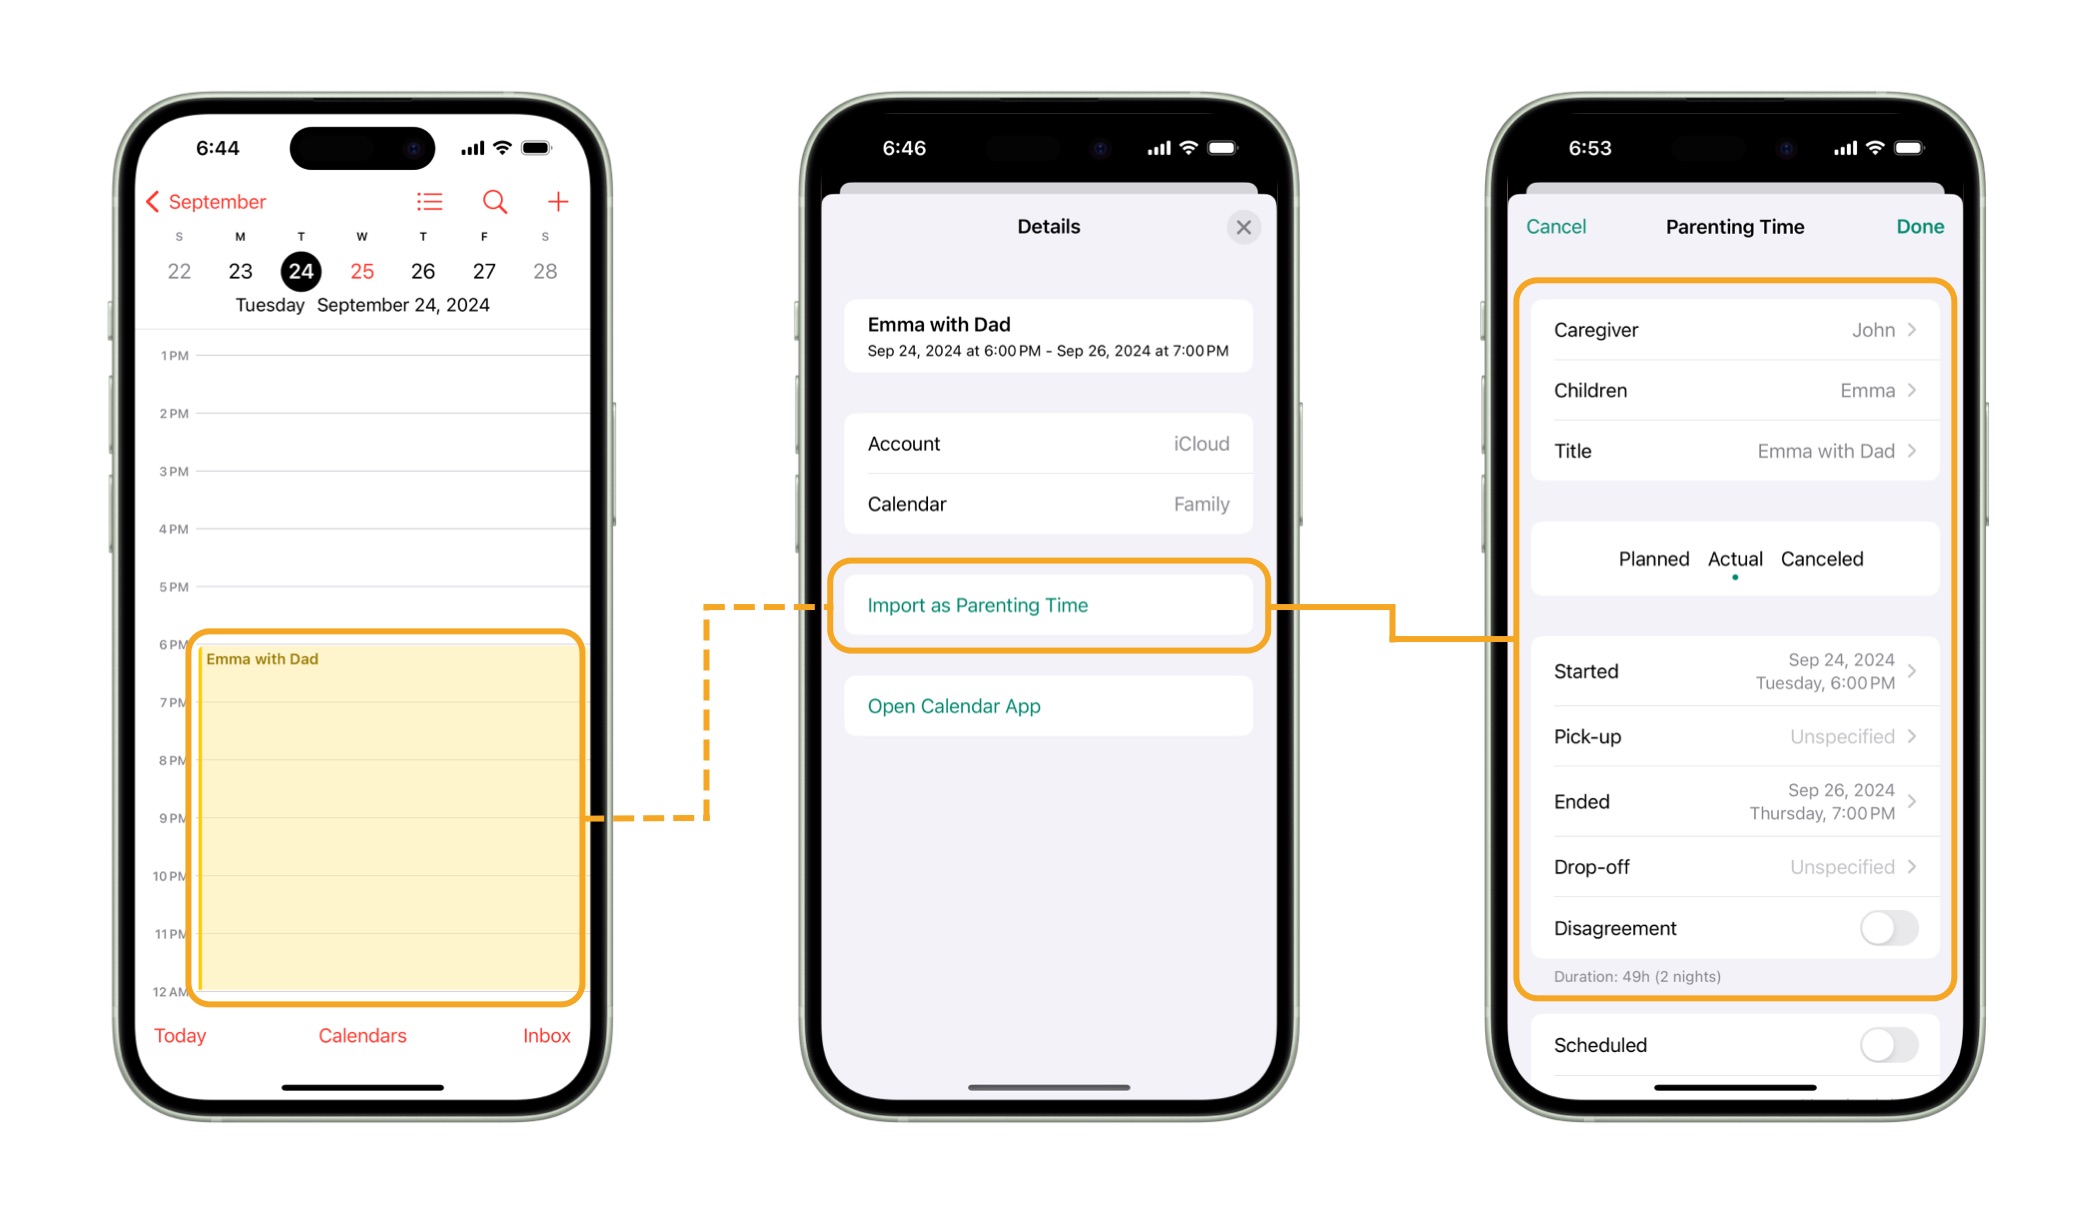
Importing events from external calendars

CalSync - Auto-Syncing Events to External Calendars

You can set up the automatic export of Alimentor records to one or more calendar accounts configured on your device (iCloud, Gmail, Outlook, etc.).

This feature allows you to share your Alimentor records indirectly with someone who doesn’t use the app, including users of Android smartphones and Windows computers.

To configure automatic export of events:
  •  iOS  Go to Settings, select CalSync, and tap Add Rule.
  •  Mac  Choose Settings... from the Alimentor menu bar, select the CalSync tab, and click Add Rule.
Limitations:
  • Photos and attachments are not exported.
  • Changes made in external calendars are not synced back to Alimentor.

By default, exported events are hidden in Alimentor to prevent displaying both the original and exported events simultaneously. You can control the visibility of exported events using the Hide in App switch.
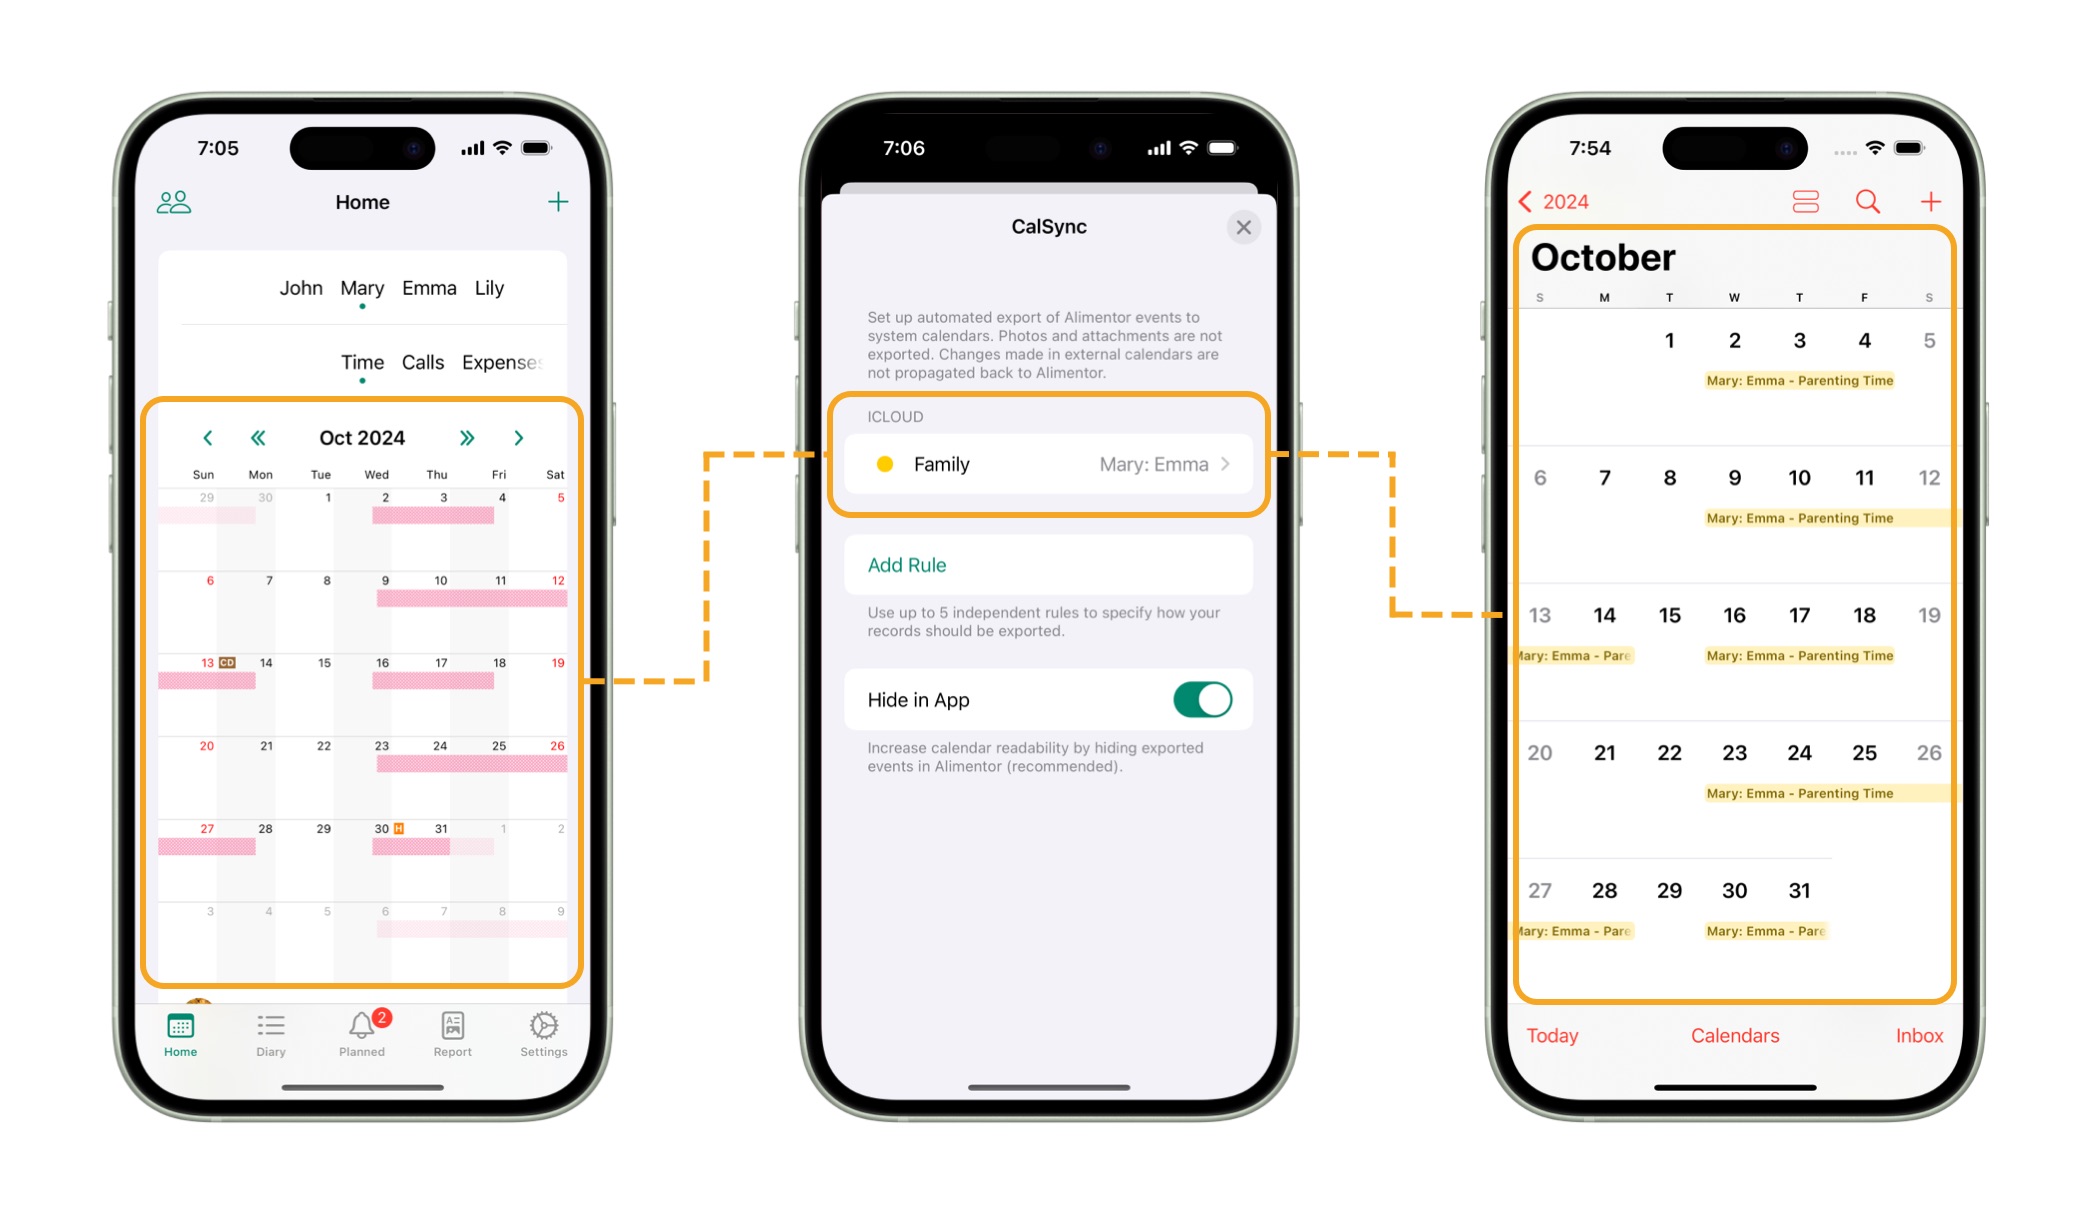
CalSync - Exporting events to external calendars

  Preparing for Legal Proceedings

In the article Documentation in Child Custody Cases , you will find comprehensive guidance on how to collect, organize, and present the evidence needed to support your case in court. The article covers:

  • Types of Documentation: Essential records such as a parenting time calendar, a custody journal, financial records, and supplementary documents.
  • Best Practices: Tips for creating detailed, objective, and timely documentation that reflects your involvement in your child's life.
  • Using Alimentor: How to leverage Alimentor features to generate court-ready reports that align with custody factors, making your case more persuasive.

Documentation in Child Custody Cases ▶

  Backup and Restore

iCloud Sync

When iCloud Sync is enabled, Alimentor automatically backs up your data to iCloud. It is strongly recommended to back up your records; otherwise, you risk losing your data if your device is lost or damaged.

To manually enable iCloud Sync:
  •  iOS  Go to Settings, select iCloud Sync, and tap Turn On iCloud Sync.
  •  Mac  Choose Settings... from the Alimentor menu bar. Select the iCloud Sync tab, and click Turn On iCloud Sync.

 iOS  If you have lost or damaged your iPhone/iPad and did not use iCloud Sync, you can refer to this Apple Support article about restoring your device from a backup .

  Data Deletion

To delete all your data (this action is irreversible):

  •  iOS  Go to Settings. If iCloud Sync is enabled, select iCloud Sync; otherwise, choose Device Data. Tap Delete Data and confirm.
  •  Mac  Choose Settings... from the Alimentor menu bar. Select the Database tab and click Delete My Data.

  Download and Installation

You can install Alimentor on iPhone, iPad, and Mac. The iOS and macOS versions of the app (sold separately) use the same private iCloud container for backup and data synchronization, so all changes are seamlessly propagated across your devices.

Alimentor requires only a one‑time purchase. There are no subscriptions.

To learn how to check your App Store purchase history, refer to this Apple Support article.

Alimentor 2 for iOS

Download on the App Store.

Requires iOS 16.4 or later.
Updated for iOS 18.

Alimentor 2 for Mac

Download on the Mac App Store.

Requires macOS Sonoma 14.1 or later.
Updated for macOS Sequoia 15.

If you’d like to try Alimentor for Mac before purchasing, take advantage of the free trial.

40‑day free trial version.

Installation: Open the downloaded archive and move the "Alimentor 2" file to the Applications folder.

  Troubleshooting

  •  macOS  If Alimentor crashes after updating macOS to version 13.2, reinstall the application. This issue affects only a small group of users. For a currently unknown reason, the update process may prevent the system from launching Alimentor correctly. Affected users have confirmed that reinstalling the app resolves the problem.

  Alimentor 1 Discontinuation Notice

Alimentor 1 (blue icon) was discontinued in December 2019 and is no longer actively updated for new iOS versions. Since November 2018, we have been offering Alimentor 2.

Migration from  Alimentor 1  to  Alimentor 2 

When Alimentor 2 is installed on a device where Alimentor 1 is already present, it automatically offers the option to import a copy of existing data from Alimentor 1. Data migration is performed directly on the device without using iCloud.

  Support Alimentor Development

If you appreciate what we’re doing and would like to support us, we’d be very grateful. Your help could include any of the following:

  • Writing a social media post promoting our app.
  • Telling your mediator or lawyer about Alimentor.
  • Adding a link to Alimentor website on your blog, profile, etc….
  • Providing feedback and feature requests.

  Can’t Find What You’re Looking For?

If you didn’t find the answers you were looking for in this guide, don’t hesitate to reach out! We’re here to help. You can contact us directly via email at feedback@alimentor.org, and we’ll get back to you as soon as possible with the support you need.